PlayaLabs is 'For Burners, By Burners'. We run tests and trials on-playa. We link to honest reviews and the best prices we can find. We always link to FREE-SHIPPING!
Lab Tests
Featured
PlayaLabs is 'For Burners, By Burners'. We run tests and trials on-playa. We link to honest reviews and the best prices we can find. We always link to FREE-SHIPPING!
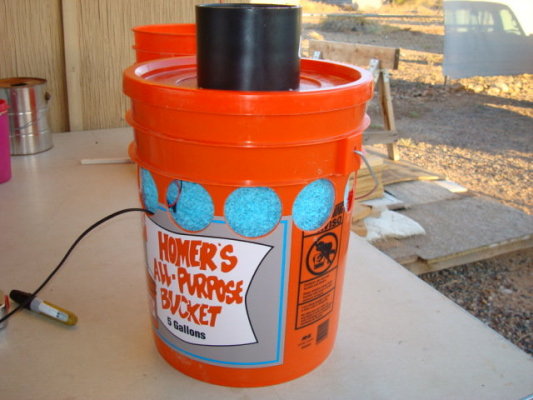
People love this little swampie! The key is following instructions to the T and getting the correct, playa-tested parts.
Do this project at home. It’s too MOOPY on-playa.
PlayaLabs does not claim credit for inventing this device! All hail Lord Figjam for his brilliance and kindness sharing the design and years of countless questions on the original eplaya forum.
From hardware store:
5-gallon bucket and lid
Misc small nuts and bolts
From online links:
Duracool pad
5 inch flex-duct
Fan
Pump
40” of clear poly hose (to fit pump above)
T connector for hose above
12v power wires
Gator clips
E6000 Adhesive
4-inch ABS coupling (this piece is actually 5” in diameter)
This part is hard to find, it's now linked on our Parts Page
Wire nuts and connectors
Hole saw for your power drill
12 Volt Battery
Swamp cooler can be wired to a single battery or you can make your own Solar Power Station, see The PlayaLab’s other tutorials!
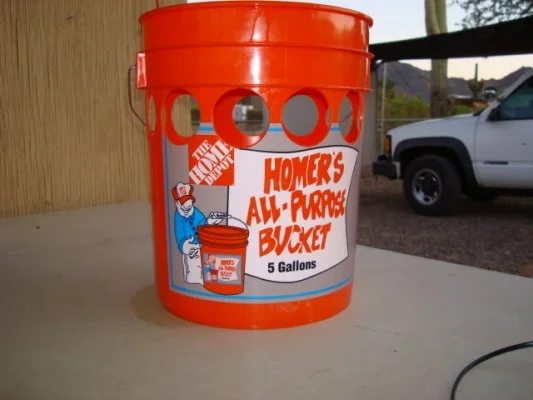
Start with your 5 gallon bucket. Use a power drill and hole saw to cut large holes in the upper ⅓ of the bucket. You can do 1 or 2 rows of holes:
You need a pad 29x30 inches. These can be hard to find. Use the genuine product from our online links. Don’t use off-brand, Aspen pad, or green scrubby pad. Get the real thing online OK, jeez stop arguing.
You will use almost the entire pad, so make your cuts carefully.
* Measure the inside of your bucket from the bottom to the top. It should be about 13 inches but some buckets are different. Cut the first pad 30 x 13 inches* (or whatever is the height of your bucket).
Roll this pad into a tube:

Test fit the cylinder it into your bucket. It should sit completely in the bucket without touching the inner side of the bucket:
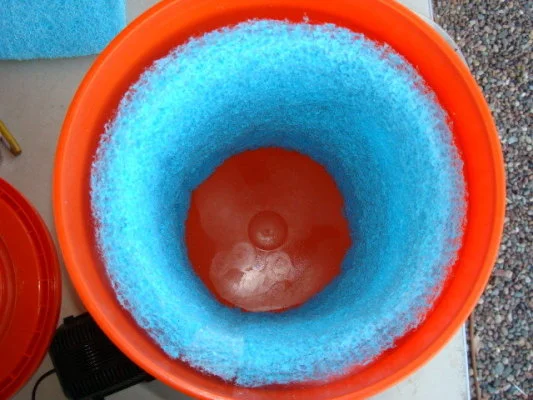
The lid should fit on and just slightly touch the top of the blue cylinder. Test fit and trim the pad as needed:
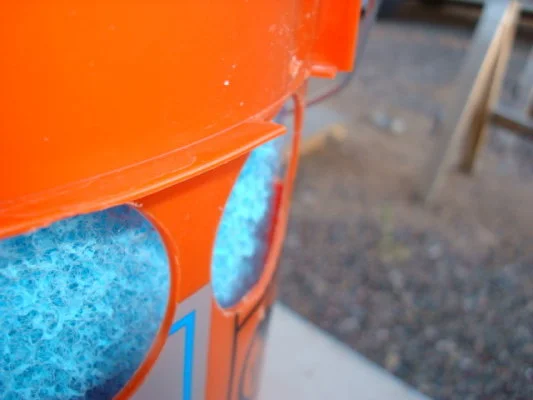
When the pad fits correctly, use the E1600 adhesive, silicone, or hand-stitch the seam with needle and thread. This will give you a cylinder ~13 inches tall:
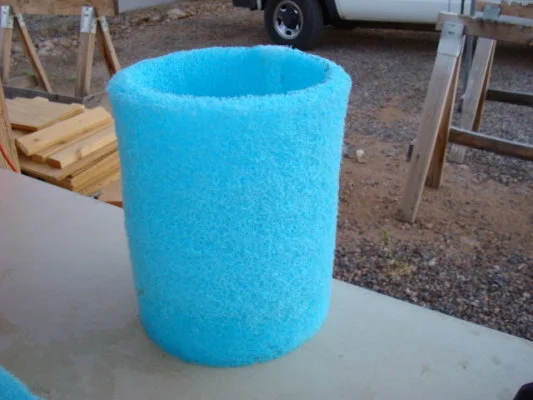
Cut a second piece of pad approx. 24x13 inches and roll into a tight tube. You don’t need to glue or stich the seam of this small cylinder:
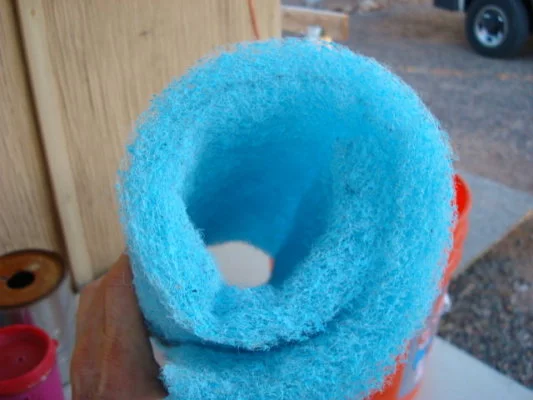
Slip the second smaller cylinder into the first blue cylinder, but not all the way in, leave the inner cylinder about an inch popped out. This creates a double-layered pad with more evaporative surfaces:

Now we build this Drip-Ring “Lasso”:

T-Connector: The branches of the T connector are too long. Using a sharp exacto knife, cut off the excess branches, leaving approx ½ inch at each branch of the T connector. This creates a smaller T joint:

Next, loop a piece of the clear poly hose into a circle and test fit it, so that it lies on top of the blue cylinder like so (it’ll be about 28” of hose):

Cut the hose at the correct length, and plug in the T connector. Put a piece of leftover hose on the stem of the T-connector to complete the “lasso” (We will trim the excess hose later):

Now to create the drip holes, you will punch holes in the LOWER side of the drip-ring. Remove the Lasso from the bucket, flip it over on the work table so you are looking at the UNDER-side of the drip-ring:

Get a candle and a thin piece of metal as a piercer (such as a thin nail or wire scrap. 12 gauge wire works well). A push-pin is a little too small but can work in a pinch. A power drill makes too jagged of a hole.
Secure your metal piercer like this so you don’t burn your fingers:

The holes in the drip-ring need to be uniform and evenly spaced. Mark dots around the bottom surface drip-ring every inch all the way around.
Heat the metal piercer with a candle flame, then press the hot metal through the drip line at each dot:

Spin the hot metal so it makes a nice hole and melts through. Make sure you don’t punch through the second layer of the hose! Don’t make the holes too big! You can always enlarge them later if needed.
Repeat every inch. You’ll have to reheat the metal piercer several times so keep the candle burning.

Place your pump in the bottom of the bucket (these photos are an old model of the pump, yours will be smaller):

Install the the drip-line “lasso”; test fit so there’s just a little slack from the pump to the top of the blue pad. Trim the excess hose, then connect the “lasso” to the pump nozzle:

Guide the power lines from the pump up and out of the bucket. Cut a small notch at the rim of the bucket to route the power lines out of bucket, so the wires don't get kinked when you put the lid on.
Fill the bucket with a few inches of water. DO NOT run the pump DRY!
You can test the 12V pump with a 9v battery. It will not run at full power but you’ll get the idea. Duct tape the red and black pump wires onto the 9v battery terminals and look for a nice, even flow of water thru the drip line. Adjust the drip line as needed. You may need to re-melt a few of the holes if they are not dripping well. Do not make the holes too big!

This is designed so that when the lid is put on, the drip line is gently pinched between the lid and the pad, so it stays secure.
Trace the inside of your 4-inch Coupling* onto the bucket lid and cut this out with a sharp exacto knife. The hole should be exactly sized to fit the round part of your fan:
*The 4-inch ABS Coupling is actually 5 inches across. Dammit! It’s called a “4-inch coupling” because it’s meant to couple 4-inch pipes together, but that means the coupling itself is actually larger.
Make sure to pick out the correct product at the store. This coupler will fit perfectly into a 5 inch flexible duct and also matches the size of the CPU fan.
This piece can be hard to find. Check the plumbing section of your hardware store or use our parts page.

Mount the fan on the inside (ie bottom) of the bucket lid. Use the E6000 adhesive and short bolts/nuts to hold it in place. Slop some adhesive to seal any gaps. The fan woks best on the bottom of the lid to keep the unit compact and to make ducting easier. Having the fan on the inside also helps the blue pad hold its shape:
Drill a small hole in the bucket lid to route the fan’s power lines up thru the lid.

Wipe the Coupler and the bucket lid with alcohol to remove any grime. Then use the E6000 adhesive to glue the Coupler to the top side of the bucket lid. Weigh this down with heavy books and let it cure for a few hours to ensure a good seal:

After letting the adhesive cure, assemble the bucket and lid. Line up the fan and pump power lines as you put the lid on. You may have to rotate the lid or adjust the placement of the pump to make the wires line up.
Be careful that the fan tucks gently into the blue-pad as you put the lid on, and don’t smash the power wires.
You can use 4 inch Schedule 80 PVC pieces or a 5 inch flex duct on the top of the lid to shoot the cool air into your structure.

The Swamp Cooler has to sit outside your structure! The flex-duct delivers cold air into your tent, rv, yurt, or whatever. But the bucket has to be outside in the dry hot air.
You must leave a window cracked inside your structure (in a tent, leave an upper vent cracked open). We’ve done all the tests. You have to do these 2 things for the Swampie to cool properly! Otherwise it builds up humidity and loses the cooling effect.
It’s not like an Air Conditioner at home where you want the windows closed tight to keep cold air in. Swamp Cooler requires a little bit of cross-ventilation to work, because it’s a pressurized system. Don’t worry about the details. That’s just how it works:
From here, you need to connect to power! We have a new tutorial on Wiring Your Swamp Cooler and/or you can build your own Solar Power Kit to run the swamp cooler and your other gadgets and lights.
Testing note: DO NOT put your fan or pump wires into a battery inverter or any other A/C power source. It'll fry them. Your fan and pump are 12v DC and should only be used directly from a 12v battery.
These are the exact specs and parts that have been tested and successful. Do not deviate from them or your results may be... devious. (Source material is the original eplaya forum. Thank you to Figjam and the eplaya community for making this possible!)
All credit to the eplaya forum and consolidated feedback from commenters (including PlayaLabs testers).
This tutorial is an edited and gently re-formatted version of the forum recap from June 29, 2016.
Photo credits from Figjam’s public eplaya forum.
Reviews of pitched-tents!
A winner with Playa-ready features